Sample preparation: why grinding, milling and sieving decide accuracy
Why a representative, homogeneous, correctly sized sample matters more than the instrument that follows, and how to choose between crushers, mills and sieves.
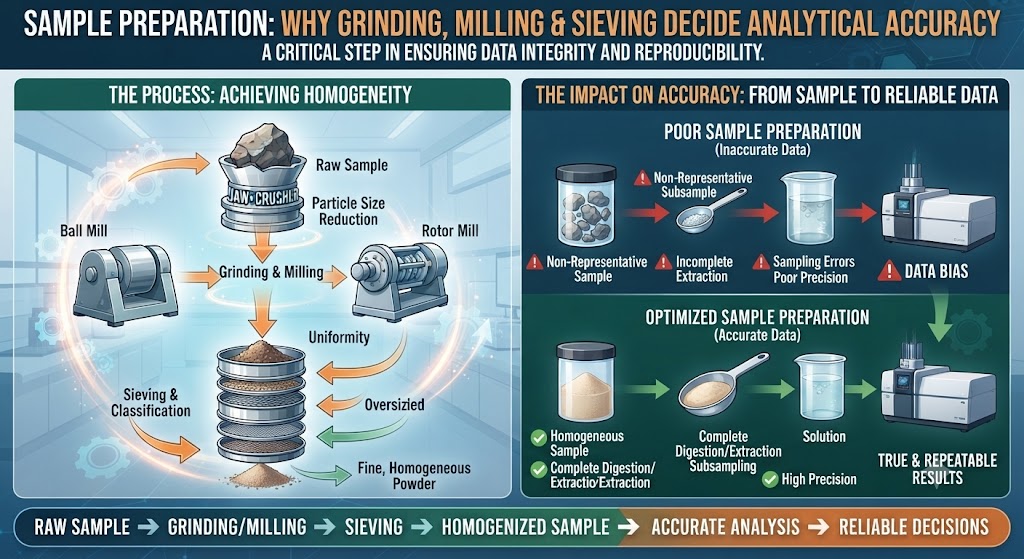
An analytical instrument can only report on the portion of material that reaches it. If that portion is not representative, or if it was contaminated or altered on the way, even a well calibrated instrument gives a precise answer to the wrong question. This article looks at the grinding, milling and sieving steps that sit before analysis, using Retsch's product overview as the main reference and independent teaching and technical material for the wider context.
Why preparation limits accuracy
Retsch states that reliable and accurate analysis can only be guaranteed by reproducible sample preparation. It describes the task as turning a laboratory sample into a representative part sample with homogeneous analytical fineness [1]. A standard analytical chemistry text makes the same point from the other side: collecting the wrong sample, or losing analyte during preparation, introduces a determinate error, and too few or wrongly sized samples hurt precision [2]. Malvern Panalytical, writing about particle sizing, adds that every technique measures a subsample and that unreliable results often trace back to how samples were taken; it mentions a spinning riffler as a way of dividing powders into representative portions [3].
Choosing the right size-reduction principle
Retsch lists the questions to settle before picking a mill: the nature of the sample (dry, tough, abrasive, fibrous, brittle, hard, soft, temperature-sensitive), feed size, required final fineness, sample volume, throughput and the subsequent analysis, including how much contamination from tool wear is acceptable [1]. Its guidance on principle is straightforward [1]:
Hard, brittle materials are best reduced by impact and friction, for example in a planetary ball mill.
Soft and elastic materials suit knife or cutting mills.
Jaw crushers are intended for coarse, primary reduction of hard, brittle materials.
Knife mills suit quick homogenisation of samples with a high liquid, oil or fat content, and the overview notes a cryokit option for cold grinding.
Ball mills can work dry or wet, and some models target very fine final finenesses.
The overview also notes that the final fineness reached depends on the sample material and instrument configuration, so apparently similar samples can give different results [1].
Staged grinding and not grinding too fine
Large particles cannot always be brought to analytical fineness in one step. Sometimes one mill with different settings can do coarse and fine grinding; in other cases two mills or crushers are needed [1]. Retsch also gives a useful rule of thumb: grind only as fine as necessary, not as fine as possible [1]. Over-grinding adds time, heat and wear without improving the result, and heat can drive off volatile components in temperature-sensitive samples.
Contamination and wear
Mechanical size reduction inevitably wears the grinding tools, and Retsch says abrasion generally lies in the ppm or ppb range, with material introduced such as steel components or heavy metals like chromium [1]. That can matter greatly if you are measuring trace metals and hardly at all for a moisture or protein test. Jaw crushers, for instance, are offered with breaking jaws of different materials (manganese steel, stainless steel, NiHard4, tungsten carbide, zirconium oxide) so the tool can be matched to the analysis, and the jaws should be harder than the material crushed [1]. Choose the tool material by asking what element you will determine afterwards.
Sieving for particle size
After milling, particle size distribution is often checked by sieving. Retsch's range covers vibratory sieve shakers for dry and wet sieving, a tap sieve shaker, and air jet sieving machines described as suited to dry sieving of fine powders, where a controlled air stream disperses the sample [1]. Test sieves come in several diameters (100, 200, 203 (8 inch), 305, 400 and 450 mm), and evaluation software records the weighing data and produces reports [1]. For laser diffraction or image analysis, which measure differently from sieves, the overview points to the sister company Microtrac [1]; results from different principles will not agree exactly, so compare like with like.
Quick checklist
Define the analysis first, then choose the preparation route.
Take a representative subsample (riffle or divide) before and after reduction.
Match the principle to the material: impact and friction for hard and brittle, cutting for soft and elastic.
Reduce in stages when the feed is coarse; grind only as fine as needed.
Pick grinding tools and jars whose wear will not interfere with the target analyte.
Watch heat for volatile or temperature-sensitive samples, and consider cold grinding.
Clean tools between samples to avoid cross-contamination.
Document sieve, mill and settings so the preparation is reproducible.
Conclusion
Good analytical results begin before the sample reaches the instrument. A representative, homogeneous sample ground by the right principle, to the right fineness and with the right tool material, removes avoidable error that no calibration can fix later. Write the preparation route into the method, as carefully as the measurement itself.
Sources
- Retsch - Product Overview: Solutions for Sample Preparation and Grain Size Analysis (PDF) (read 2026-10-20)
- LibreTexts Analytical Chemistry - Obtaining and Preparing Samples for Analysis (read 2026-10-20)
- Malvern Panalytical - Basic Guide to Particle Size Analysis (part 3), sampling section (read 2026-10-20)